
Guide to the Yours PA system
(A printed version of this guide lives in the amp cupboard)
This guide provides an overview of how to use the Yours PA system.
The first section is a basic guide for simple setups.
The second has some more advanced techniques for live performances.
Basics
The speakers are known to make sound. They do not have power, so we have amplifiers, located in the cupboard.
We plug our sound sources into the mixer, located at the back of the stage. This sends the sound to the amplifiers, which control with the tablet.
Turning on
We turn the mixer on before the amps. This will avoid a big scary noise.
(See guide on wall next to amps for ON/OFF sequence)
Turn on the tablet. Plug in if required for power.
The mixer outputs WiFi - connect to this with the tablet (something with MR-18 in its name)
Open the M-Air app and connect to the mixer (again - something with MR-18 in its name).
M-Air Overview
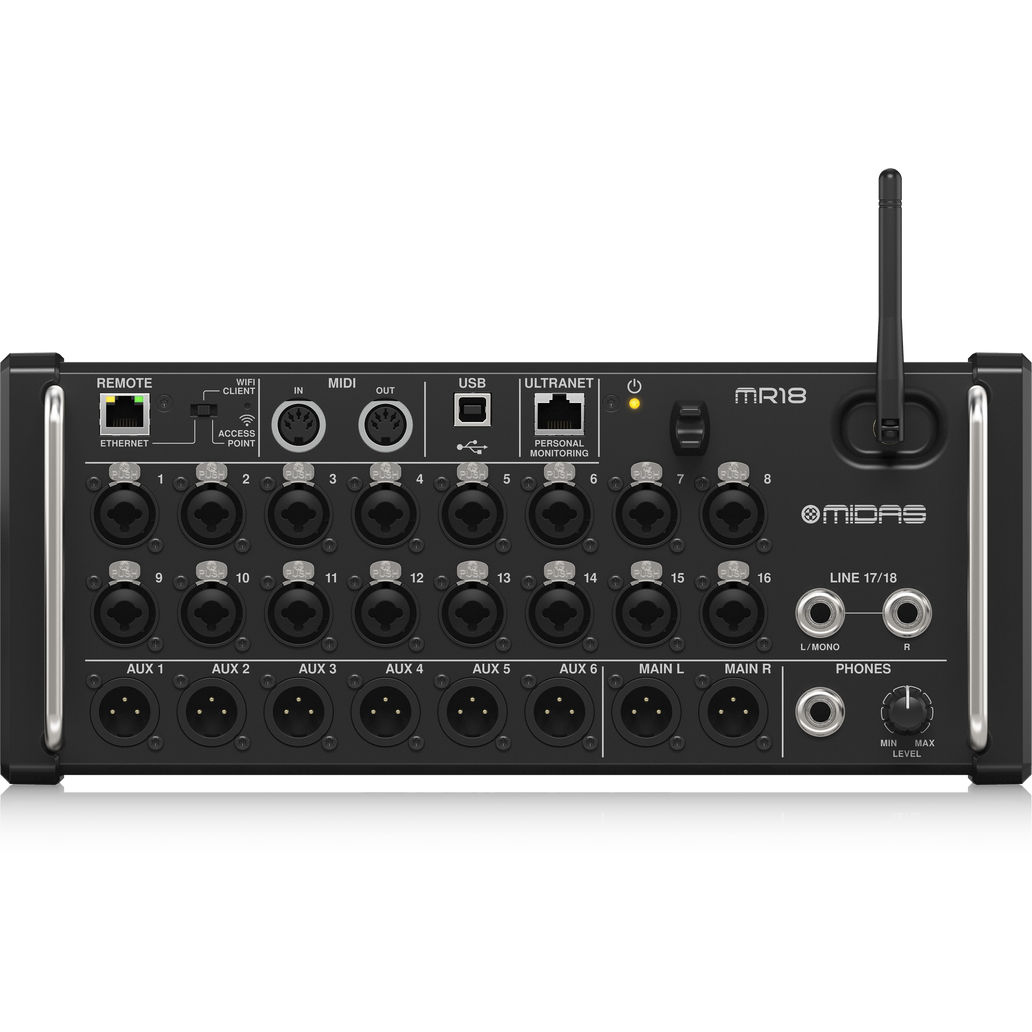
The mixer has 18 inputs, thankfully labelled numerically. (we can get to the other plugs later).
Because there are so many channels, the app displays them across multiple displays.
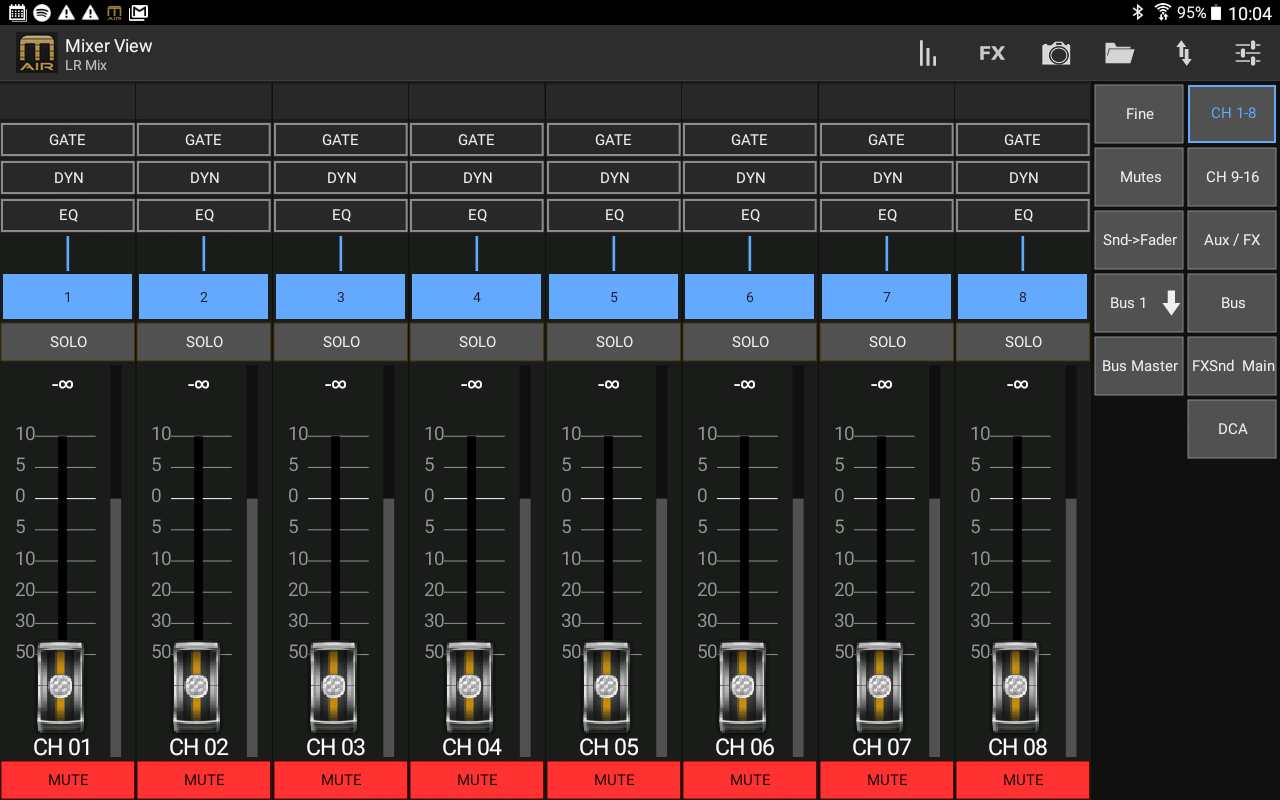
On the right hand side you can find:
-Channels 1-8 in “CH 1-8” display
-Channels 9-16 in “CH-9-16” display
-LINE 17/18 - in “Aux / FX” display
Use the sliders to adjust the volume. Take note of the mute and solo buttons.
Use channels 1-16 for plugging in microphones, instruments, or other devices. You can use either XLR cables (the one with the 3 pins), or a ¼ inch jacks (the one that looks like a guitar lead).
Use LINE 17/18 with aux cable for plugging in laptops or other devices for music playback
Microphones and instruments normally operate at very low volumes, in order to correct for this we need to go into the advanced setting for the channel. Press the channel name (“1” in screenshot example) to see the channel menu and bring up “Gain” (~20db is a good start).

This lets everything operate on a more-or-less even footing.
Advanced
Foldbacks
Musicians (especially vocalists), will want to hear themselves on stage. For this we use the speakers on stage - called “foldbacks”. (like the PA - make sure to turn these on after the mixer).
The stage performers will require a different mixture of volumes than what you are sending to the main speakers. In most cases this will prioritise vocals and instruments which are not amplified on stage already.
In order to create this mix you can either:
1) use the “SENDS” menu, located within each channel menu.
or
2) engage the “Snd->Fader” button, select which bus you wish to control (button below “Snd->fader” button) and use the faders to adjust the volume of each input channel into the selected foldback
The foldbacks should ideally be at the front of the stage pointing in the same direction as the microphones, as to avoid potential feedback issues.
To control the main level of each foldback, use the “Bus” menu (also note the “bus master” menu).
Instruments and Microphones
Our stage has various different microphones which can be used for different things.
-The sm58’s and Beta58A are our best ones, so start with those for vocals.
-Guitar amps, and instruments can also be mic'd up (better to have it and not use it)
-There are clip-on drum microphones in their case. The large one is for the kick drum, and the other three are usually placed on the snare, high tom, and floor tom. The overheads do not work, but are also not really required.
Instruments that plug directly into the mixer will require foldback volume so the performer can hear themselves.
We normally run the bass guitar into a DI box, which then runs into both the amp and the mixer (then you can the big subs working).
Reverb and effects
The mixer is capable of applying effects to sounds. In virtually all cases this is not necessary as the performers should already have the capability to create the sounds they have designed. However one very useful effect is gently applying reverb to vocals to help the sound “blend”.
To apply the reverb effect go into the channel’s menu and bring up FXSnd 1 or FXSnd 2 in the “SENDS” menu (1 and 2 are different length reverbs).
Compression
Perhaps the most useful of all tools is compression, specifically when used for vocals. This can be found in the “DYN” menu, under each channel’s menu. Engage the S/E button to see the settings.

Compression takes the volume and automatically reduces it when it gets past a “threshold” volume. This is useful as every vocalist’s volume is variable.
To engage the compression, toggle the ON button.
While someone is using the microphone (ideally the performer in soundcheck), bring down the “Thr” (threshold), until the compressor engages (you will see the blue line start to drop down from the top). Then using the “ratio” you can choose how much to squish the loud parts. The higher the number the more squish. The goal is not to squish the entire performance, but only to squish the loud parts to make them comparable to the rest of the mix.
EQ
One of the greatest tools used by sound engineers is the equaliser, or EQ, which allows us to adjust the balance of the sound, and also negate unwanted tones.
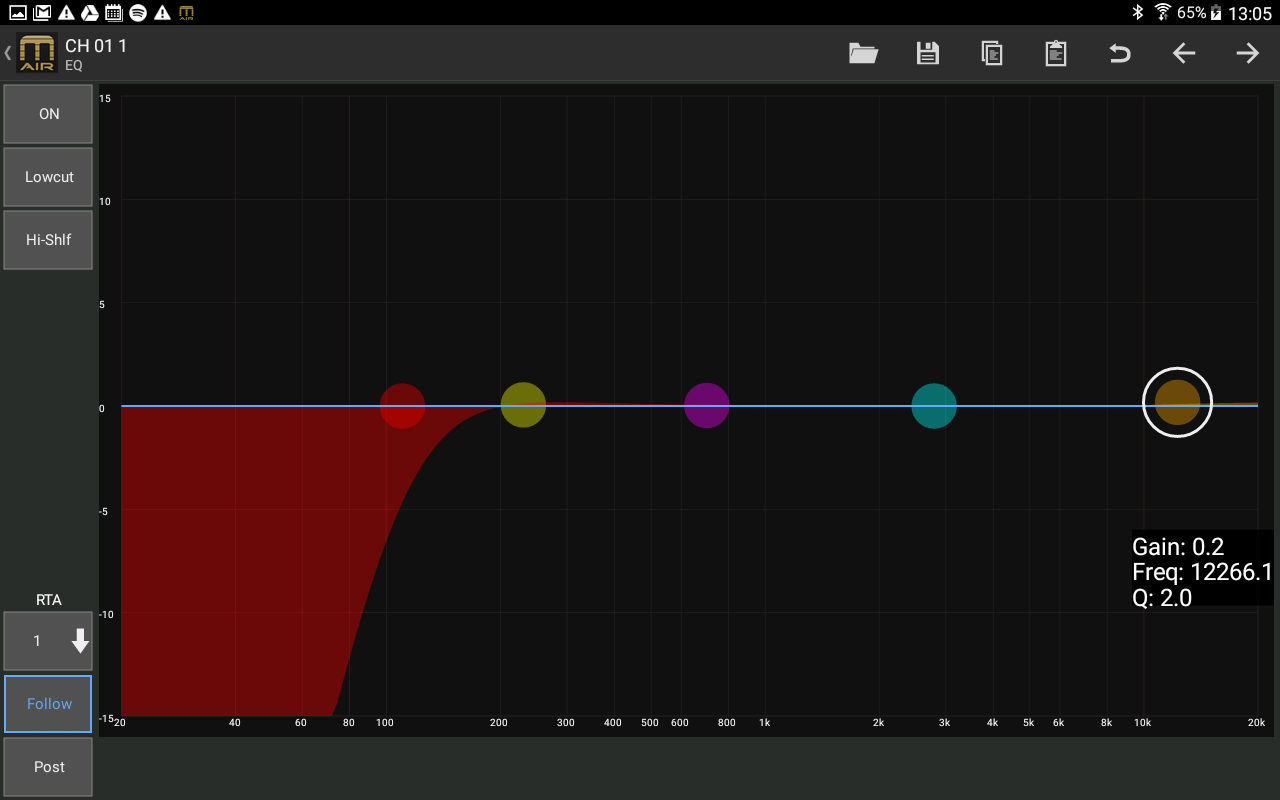
This can be found in each channel’s menu. Select a node and use your fingers to shape the curve.
The EQ should firstly be applied to minimise unwanted sounds. This can be done for each channel individually at soundcheck. This usually involves cutting out unwanted frequencies. This could involve cutting out feedback resonances, or reducing noise. For microphones, a “low cut” will greatly help reduce handling noise. For many channels there might be frequencies that are not required at all.
Secondly the EQ should be used to help blend all the elements together. This could involve reducing certain frequencies of one instrument to enable another to be heard more easily, or boosting other frequencies for a desired tonal emphasis.
Note: it can be easy to overuse EQs, or try EQ out problems which require a direct solution.
Learnings from a sound operator
Here are some general learnings from my sound time:
-Treat acoustic guitars as a percussion instrument. Do not compress and scoop out frequencies to make room for other stuff.
-Electric guitarists usually have their stage amp turned up way too loud. Don’t give in to their self-importance.
-For many gigs, drums are the loudest fixed sound. This means you are normally mixing to the volume of the drums (usually cymbals or snare). If the drummer is wearing earplugs that means everyone else in the room probably should be wearing earplugs too.
-Most feedback issues are to do with vocalists and and foldbacks - don’t be afraid to move foldbacks or cut foldback EQ.
-Start off with dynamic freedom (non-compression), if the vocalists cannot utilise it then their privilege gets lost.
-Watch the performers, not the tablet.
No Comments